Времена, когда всех мерили под одну гребёнку, канули в Лету. Теперь каждый человек может проявить свою индивидуальность в любых мелочах, даже завязать шнурки по-особенному — не так, как у остальных. Главное, чтобы бантик не остался снаружи и предательски не торчали из обуви кончики.

Почему торчащие шнурки — это неэстетично
Молодёжь много внимания уделяет мелочам. Там, где взрослый человек «обул и забыл», подросток будет долго примеряться, подбирать цвет и длину шнурков. А потом расстроится из-за торчащего бантика. Да и развязывается он постоянно, угрожая владельцу спортивной пары обуви падением, если наступит на торчащий конец.

Конечно, кроссовки будут смотреться значительно привлекательнее со шнуровкой, которая уходит куда-то внутрь. Но как добиться такого эффекта? Оказывается, есть такая возможность.
Как шнуровать, чтобы не торчали шнурки
Существует несколько способов шнуровки, чтобы концы не торчали наружу:
- Их можно просто спрятать внутрь кроссовок под стопу, а остатки прикрыть бортами обуви. Но не думайте, что этот способ убережёт вас от возможного падения. Ведь не завязывая шнурки, вы не сможете плотно зафиксировать стопу в обуви, так что есть угроза потерять и кроссовки, и равновесие во время быстрой ходьбы. Используйте этот метод только в крайних случаях, когда нужно быстро обуться и недалеко пройти.

- Этот способ более надёжный, чем первый, хотя тоже может причинить некоторые неудобства. Зашнуруйте как обычно, а бантик завяжите не снаружи, а под язычком. Задача решена – бантик и концы шнурков не торчат. Но может возникнуть другая проблема – узел будет давить на стопу во время передвижения.
- Если шнурки слишком длинные и спрятать их под язычок не удаётся с первого раза, прежде чем завязать бантик, пропустите их вокруг стопы и только потом завяжите. Если шнурки не натрут стопу, то сможете пользоваться этим способом регулярно.
- Испробуйте способ двойной шнуровки,
Красивые методы шнурования концами внутрь
Для эстетов, которым мало того, чтобы бантик не торчал наружу, но ещё хочется, чтобы сама шнуровка выглядела красиво, рассказываем, как этого можно добиться:
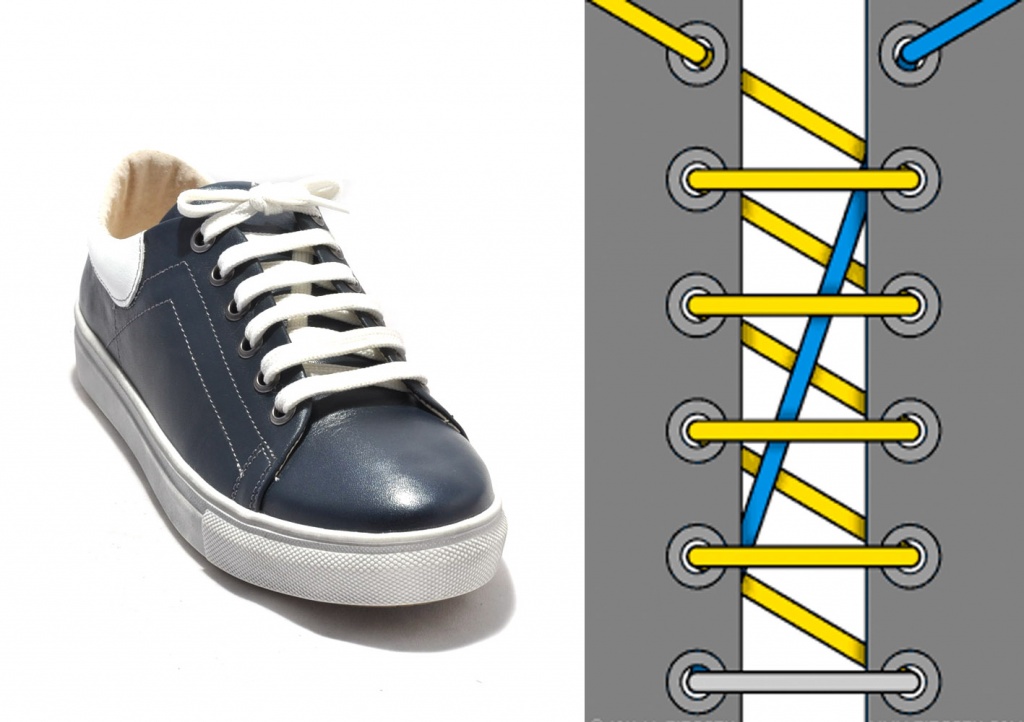
1. Проденьте один конец шнурка в самое верхнее отверстие, пропустите снаружи прямо горизонтально и вденьте внутрь. Вытащите его в следующем отверстии, которое расположено через одну ячейку. Снова пропустите горизонтально на противоположную сторону, вденьте снаружи внутрь и через одну ячейку вытащите наружу. Пройдя таким образом до самого низа, повторите действия в обратном порядке, на этот раз продевая в оставшиеся свободные отверстия. А узелок завяжете изнутри, когда оба конца шнурка сойдутся вместе.
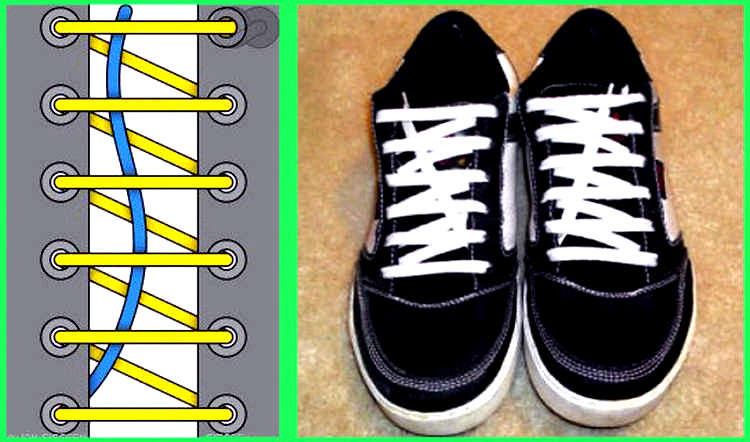
2. Это плетение считается самым сложным, но выглядит привлекательно. Для начала проденьте эглет в верхнюю шестую дырочку снаружи, проведите наискосок и воткните в противоположную четвёртую снаружи внутрь. Затем снова сделайте зигзаг и проденьте шнурок во вторую снаружи внутрь. Вытащите через первую, которая рядом, изнутри наружу. После чего проведите в третью противоположную изнутри наружу, наискосок во вторую снизу вверх. Далее проведите во вторую противоположную дырочку снаружи внутрь и делайте зеркальные зигзаги, пока шнурок не окажется снова в первом отверстии.

3. Если предыдущий способ больше понравится девушкам, то брутальных парней скорее заинтересует этот. Пропустите шнурок в верхнюю шестую дырочку изнутри наружу, затем в противоположную пятую изнутри наружу, вернитесь на третью наискосок, затем во вторую противоположную и, наконец, в первую. Всё время вводите эглет с изнанки на лицо. Затем сделайте перпендикулярный стежок к первой противоположной стороне, засуньте шнурок с лица, после чего проделайте зеркальные зигзаги изнутри наружу.
4. На высоких кроссовках хорошо будет смотреться прямая шнуровка. Оба кончика засовываем в две первые дырочки снаружи внутрь, чтобы образовалась прямая линия. Один шнурок заводим во второе отверстие с той же стороны изнутри наружу, а второй – в третье. Продолжаем чередовать левую и правую часть шнурка, пока не дойдём до верха, где проведём оба шнурка снаружи внутрь в шестых отверстиях. А сверху на кроссовках получатся красивые ровные стежки.

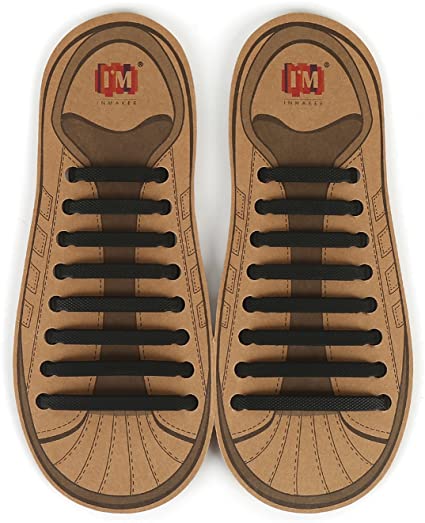
Ленивые шнурки
Китайцы подсуетились и в этом деле, выпустив шнурки без каких-либо бантиков. Секрет прост: они крепятся в двух местах к кроссовкам или кедам, а сами сделаны из… резинки. Поэтому можно легко снимать-надевать обувь, и никакого завязывания-развязывания.

Но отзывы о подобной новинке неоднозначные. Потребители жалуются, что резинки очень быстро выходят из строя и, растягиваясь, перестают плотно фиксировать кроссы на ногах. А ещё крепления выглядят не очень презентабельно.
Теперь вы знаете, как важно уделять внимание мелочам и обязательно избавитесь от надоевших бантиков из шнурков, убрав их внутрь обуви любым из перечисленных выше способов.
Подпишитесь на наши Социальные сети
Поделиться в соц. сети
Нашли ошибку? Выделите её и нажмите Ctrl + Enter. Мы все исправим!
Шнурки – это не только важный атрибут кроссовок, позволяющий обуви плотно держаться на ноге. Благодаря различным техникам завязывания они становятся настоящим украшением образа. Научиться оригинальной шнуровке совсем не сложно, следует лишь проявить немного креативного мышления.
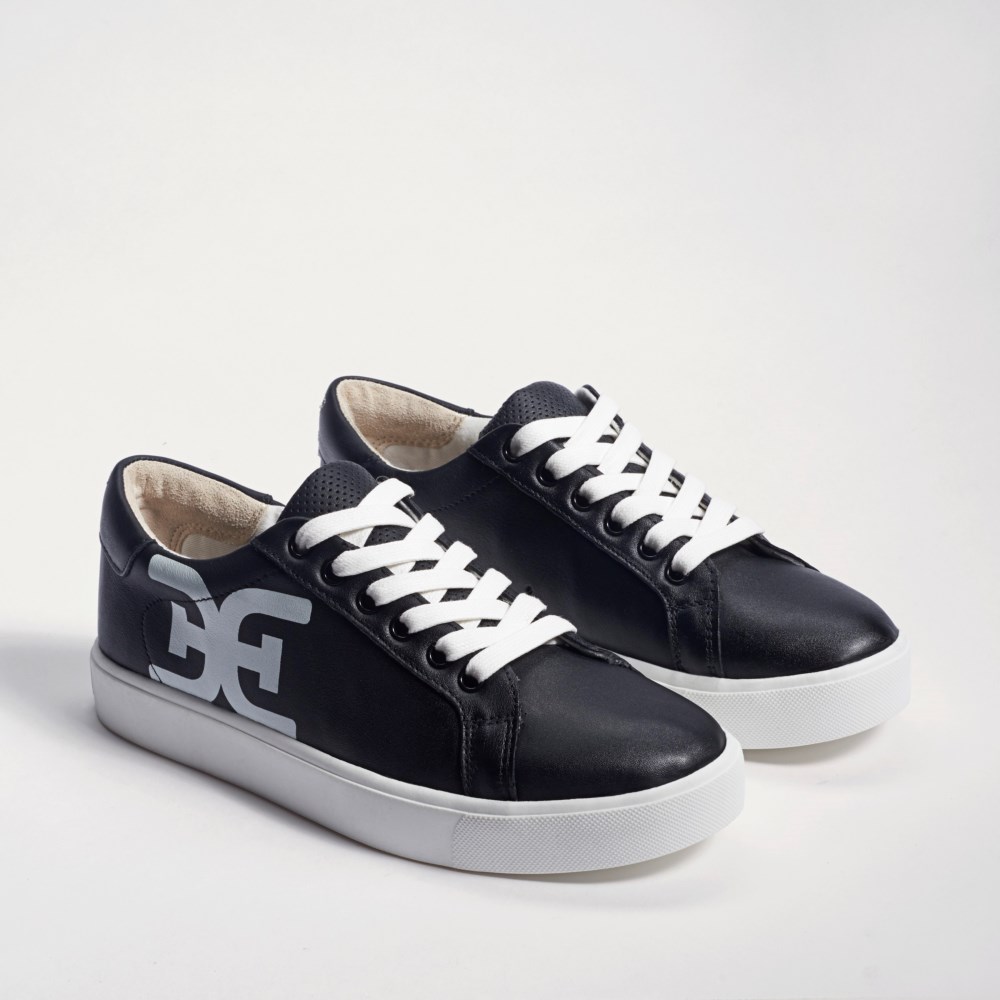
@samedelman.com
Варианты шнуровки кроссовок без бантика
Многие спортсмены и люди, предпочитающие спортивную обувь в повседневном стиле, стараются завязывать ленты на ботинках так, чтобы бант оставался внутри. Не слишком удобно, когда поверх стильного кроссовка нависают большие «ушки» тесьмы.
Специалисты предлагают несколько видов шнуровки, при которых бантик не делается. Они удобны и универсальны, подходят также для спортивных кед.
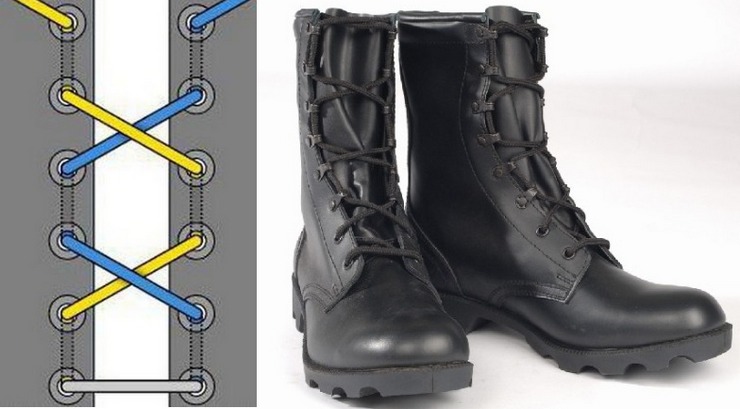
Традиционный
Удобно завязывать на ботинках с 6 дырками. Чётное количество отверстий обеспечивает выравнивание концов тесьмы. Узел получается симметричным и аккуратным. Чтобы сделать традиционную параллельную шнуровку, ленту вставляют в первый сверху ряд и протягивают до последней дырки снизу. С неё и будет производиться затяжка.
Вторую часть тесьмы переносят повыше и переводят на другую сторону ботинка. Заполняют люверсы шнуровкой.
@amazon.com
Классическая
Очень похожа на параллельную, но в этом варианте узел завязывается внутри ботинка между отверстиями сверху кроссовка. Свободные концы тесьмы обрезаются. Такой способ не подходит людям, которые не умеют или считают неудобным единожды завязанные шнурки. Ведь спортивную обувь тогда придётся надевать и снимать, не трогая тесьму.

@tkaner.com
Бабочка
Достаточно оригинальный и привлекательный вид шнуровки. Перекрещивания тесьмы выглядят необычно и словно приклеены к язычку кроссовка. Для начала верёвку располагаем в нижний люверс на противоположные стороны. Затем продеваем концы в верхние дырки на той же стороне.
Далее перекрещиваем их и продеваем в верхние дырки. Важно, чтобы лента «смотрела» внутрь ботинка. Продолжаем шнуровку аналогично до последней линии отверстий.
@obuv.expert
Паутинка
При таком способе шнуровки на поверхности кроссовок образуется плотное переплетение. Его будет проблематично затянуть, но оно прекрасно держит ногу. Подходит для людей, предпочитающих носить свободные кроссовки, не развязывая шнурков.
Тесьму продевают в первый ряд и перекрещивают при выпуске. Пропуская два ряда снова продевают в люверсы и перекрещивают по диагонали. Поднимают шнурки изнутри через соседние люверсы. Затем делают диагональ вниз, продевая свободные концы под язычок и завязывая узел.
@shelly.ru
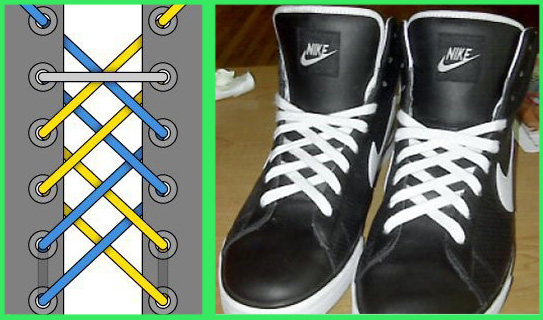
Решётка
Хорошо смотрится на кроссовках с шестью дырками. Верёвку продевают в нижние люверсы параллельно друг другу. Далее их перекрещивают и протягивают через два отверстия сверху. Один шнурок в этом же ряду продевают изнутри наружу. С другим свободным концом проделывают те же манипуляции.
Конец шнурка слева продевают во второе свободное отверстие, которое осталось не тронутым. Зеркально повторяем манипуляцию с правым концом шнурка. В завершение они выводятся через верхние люверсы внутрь кроссовка. Завязываем на узел.
Этот вариант достаточно сложный и требует определённой сноровки
@obuv.expert
Змейка
Простой и интересный способ зашнуровать кроссовки без бантика. Достаточно закрепить тесьму с помощью узла в верхней части ботинка и шнуровать по диагонали. В результате должны получиться прямые линии снаружи и диагональные – изнутри.
Свободный конец тесьмы пропускают под шнуровкой и заправляют внутри спортивного ботинка. Он не несёт смысловой нагрузки, но способен оригинально дополнить декор обуви.
@samnasam.pp.ua
Возможностей зашнуровать кроссовки без традиционного бантика много. Используются простые и сложные виды плетения. Это зависит от желания человека и его умения завязывать красиво тесьму.
Kак спрятать шнурки в кроссовки —
Многие люди отдают предпочтение не классической обуви, а кроссовкам. При этом перед ними то и дело возникает вопрос — куда спрятать шнурки? На самом деле, сделать это можно разными способами. Сегодня мы их и рассмотрим.
Первый вариант
Самый простой вариант, который применяется издавна — затянуть шнурки, не завязывать узел, а потом концы спрятать под стопу. То, что останется, спрятать за борта. Не очень большие расстояния вы так пройти сможете. Сказать, что данный способ очень эффективный, тем не менее, будет нельзя.
Второй вариант
Этот способ более надежный. Завязываем шнурки как обычно. А их концы стоит спрятать за язычок, чтобы их не было видно. Узел может немного мешать вам, но все-таки вариант нельзя назвать плохим. Он довольно удобный.
Третий способ
Если шнурки очень длинные, можно воспользоваться таким методом. Сначала шнурки обматываются вокруг стопы. Потом нужно сделать узел. После его прячут под язычок кроссовок.
Такая методика является безопасной. Применять ее очень просто.
Четвертый способ
Если шнурки слишком длинные, чтобы они не торчали, можно использовать кардинальный способ. Просто-напросто их регулируют по длине. Те части, которые не нужны, отрезают. Концы веревочек промазывают клеем, чтобы они не ворсились.
Можно сказать, что такой способ является промежуточным. Но в некоторых ситуациях он может спасти вас.
Пятый метод
В данном случае никаких кардинальных мер применять не придется. Делаем двойную шнуровку и все. То есть, когда нужно завязать концы веревочек, просто совершаем обратный процесс. Опять заводим их в отверстия, можно в несколько, пока они не станут очень короткими. Потом их просто предстоит спрятать. Все очень просто и доступно.
Итак, чтобы спрятать шнурки без бантика, стоит определиться, какие они — длинные или короткие, и что для вас важно — быстро или качественно. Мы представили несколько техник, отличающихся простотой. Попробуйте — с их помощью можно зашнуровать любые кроссовки. Надеемся, что после этого ходить в них будет приятно и комфортно.
Если вы носите укороченные брюки или подворачиваете их так, что видно шнуровку, то придется завязывать шнурки самым привычным способом – бантиком. Если же большая часть шнуровки скрыта за брюками – поступайте так, как вам удобнее. В случае с высокими ботинками длинные шнурки можно предварительно несколько раз обвязать вокруг голенища. Для классических ботинок необходимо грамотно подбирать шнурки – чтобы их концы и сам бант не доставали до подошвы.
Фото: архив GQ
Часто проверяете почту? Пусть там будет что-то интересное от нас.
Как укоротить шнурки на кроссовках без обрезки
Вы приобрели себе пару новых кроссовок на модной высокой подошве. Но когда вернулись из магазина домой и ещё раз примерили обновку, заметили, что шнурки слишком длинные и портят весь стильный образ. Не спешите снова бежать в магазин за новыми шнурками. Ваша проблема легко решаема в домашних условиях.

Определяем, на сколько будем уменьшать
Слишком длинные шнурки не только выглядят некрасиво, но могут привести к падению, если вы ненароком наступите на выступающий край. Поэтому выход один – их нужно укоротить. Это не займёт слишком много времени.

Для начала ещё раз наденьте кроссовки, зашнуруйте и завяжите так, как будете носить. Отмерьте, сколько лишних сантиметров нужно убрать. Если линейкой пользоваться неудобно, измерьте лентой длину торчащих кончиков.
Что понадобится для работы

Перед тем как приступить к укорачиванию, подготовьте всё необходимое:
- острые ножницы;
- маркер или фломастер;
- прозрачный скотч;
- полиуретановый клей или лак для ногтей;
- соломку для коктейля или термоусадочную трубку;
- зажигалку или свечу.
Работу по фиксированию кончиков начинайте сразу же после обрезки.
Как будем укорачивать

Сняв с ног и расшнуровав кроссовки, приложите ленту, которой замеряли длину излишков, и отметьте это место маркером. Далее можно действовать несколькими способами.
При помощи скотча
Самый простой способ укоротить шнурки – воспользоваться скотчем. Отрежьте лишние части и зафиксируйте образовавшиеся новые кончики прозрачным скотчем.

Чтобы операция прошла более-менее удачно, положите скотч на стол липкой стороной кверху. В середину определите кончик шнурка и плотно обмотайте скотч вокруг него. Для надёжности можно капнуть капельку клея на эглет, а затем уже зафиксировать скотчем. Лента будет надёжно держать ткань на шнурке, и он не будет кататься.
Одна проблемка – скотч смотрится не очень эффектно, так что если у вас кеды для бега, можете укоротить таким образом, а если выходные дорогие кроссовки, то такая переделка их испортит.
При помощи клея
Намного аккуратнее будет смотреться шнурок, у которого место фиксации обработано клеем. Ножницами отрежьте лишние кусочки шнурков, а образовавшиеся кончики зафиксируйте полиуретановым клеем не более чем на 1 см. Придайте капельке клея конусовидную форму, слегка надавив.

После высыхания можете повторить операцию, нанеся ещё один тонкий слой клея – так шнурок станет прочнее и будет выглядеть аккуратнее.
После такой процедуры придётся долго отмывать руки от клея, но оно того стоит. А чтобы руки не испачкались, можно воспользоваться перчатками.
Другие виды клея использовать не рекомендуется.
При помощи соломки
Но самыми привлекательными будут шнурки, обработанные с помощью соломки для коктейля. Отрежьте шнурки по намеченной линии. Вырежьте 2 кусочка трубочки, чтобы их длина не превышала 2 см. Кончики проденьте в трубочки так, чтобы ткань шнурка не выглядывала наружу.

Поднесите к концу трубочки зажигалку и нагрейте трубочку. Делайте это осторожно, чтобы не опалить пластмассу до черноты. От тепла соломка скукожится по краям и образует конус, зрительно напоминающий колпачок. После обработки обоих концов шнурка его можно заправлять назад в обувь.
Желательно подбирать цвет трубочки под цвет шнурка. Но если вы любите эпатаж, тогда можете воспользоваться контрастными цветами.
Советы бывалых

Те, кто уже занимался на практике укорачиванием, хорошо усвоили несколько правил:
- резать нужно только очень острыми ножницами, чтобы не разлохматить кончики;
- нельзя укорачивать шнурок с одной стороны, так как в этом случае у вас выйдет абсолютно два разных кончика;
- чтобы не мучиться с кончиками, можно обрезать ненужную часть шнурка посередине, после чего связать обе части вместе и зафиксировать для надёжности клеем;
- не используйте «Супермомент», так как он приклеит шнурок к вашим пальцам, и будет затруднительно сформировать кончик;
- водостойкий клей можно с успехом заменить прозрачным лаком для ногтей;
- соломку можно заменить термоусадочной трубкой, которой можно разжиться у электриков;
- вместо зажигалки можно воспользоваться зажжённой свечой или мини-утюжком, если таковой имеется;
- ввинчивайте конец шнурка в трубочку, чтобы он меньше растрепался;
- синтетические шнурки можно сразу расплавить над открытым огнём, и получите аккуратный эглет;
- проводите процедуру над раковиной, чтобы в случае воспламенения сразу же затушить огонь;
- прежде чем приступить к шнурованию, дайте кончикам хорошенько высохнуть.
Когда шнурки высохнут, вденьте их в кроссовки и убедитесь, что отрезали достаточно. Но если они снова длинные, операцию придётся повторить.
Подпишитесь на наши Социальные сети
Поделиться в соц. сети
Нашли ошибку? Выделите её и нажмите Ctrl + Enter. Мы все исправим!
Даже самого спокойного человека способны вывести из себя постоянно развязывающиеся шнурки. Они путаются под ногами, пытаясь поставить подножку, вынуждают постоянно останавливаться и заново перевязывать ботинки, а то и опаздывать на работу или важную встречу. Из-за подобной мелочи многие начинают носить обувь исключительно на молнии или липучках. В чём же секрет капризных шнурков и что делать с этим?
Почему они развязываются?
Итак, что же становится причиной развязывающихся шнурков? Возможных причин существует несколько:
- Обычно такая неприятность происходит с синтетическими шнурками, петли которых очень скользкие и легко расползаются. Достаточно небольшого внешнего воздействия, даже лёгкой вибрации. Чуть меньше этому подвержены плоские шнурки. А вот круглые регулярно создают неприятности.
- Вторая группа причин это человеческий фактор. Обувь может быть зашнурована неправильным узлом, он может быть недостаточно затянут либо оставлены очень длинные свободные концы, которые цепляются при ходьбе и лезут под ноги.

Есть ли способы их хорошенько закрепить на кроссовках?
Если причина кроется в материале, из которого они сделаны, то решение лежит на поверхности — достаточно просто поменять их на другие. Лучшим вариантом будут мягкие плоские шнурки из хлопчатобумажных волокон, которые при завязывании образуют тугой узел и не проскальзывают, а, наоборот, ещё прочнее держатся. Это решение подойдёт для кроссовок и кед, а как быть с классической обувью?
Чтобы избежать этих неприятностей, завязанный узел и его концы можно заправить или убрать внутрь ботинка. Так он будет меньше подвергаться воздействию со стороны. Также можно использовать силиконовые шнурки, которые не развязываются в принципе из-за особенностей своей конструкции. Но это тоже вариант, подходящий только для спортивной и детской обуви.
Некоторые производители спортивной обуви озаботились этой проблемой заранее и используют для своих моделей шнурки из резины. Фактически они зашнурованы постоянно, а натяжение регулируется специальной защёлкой, которая затем убирается в кармашек на язычке. Кроме того, резиновый шнур обычно усилен специальной вставкой из карбона. Такая шнуровка не подведёт в ответственный момент.

Как завязывать, чтобы шнурки держались подольше?
Если же заменить капризные шнурки возможности нет, то следует пересмотреть подход к их завязыванию. Есть несколько хороших способов зашнуровать ботинки, которые будут эффективнее, чем известный с детства бантик. Самый простой из них — это модификация классических «заячьих ушей». Петли делаются немного длиннее, а затем перевязываются между собой. Также этот узел можно усовершенствовать, продев его петли в одно из отверстий два раза.
Но существуют и более сложные по конструкции узлы, которые, тем не менее, легко разучить. Они держатся лучше и не развязываются даже во время занятий спортом. В их число входят:
1. Узел Яна Фиггена — сначала делается одинарный простой узел, затем концы складываются в виде петель, продеваются друг в друга и затягиваются.

2. Двойной скользящий — петли перекрещиваются, заворачиваются в противоположную от узла сторону, продеваются под него и затягиваются.

3. Хирургический — он завязывается также как классический, но для прочности одна из петель продевается сквозь другую несколько раз и только потом затягивается.

4. Морской или рифовый — он удобен для завязывания коротких шнурков. После формирования простого узла делается ещё два полуузла. Готовый узел очень прочный, но легко развязывается при необходимости.
Подпишитесь на наши Социальные сети
Поделиться в соц. сети
Нашли ошибку? Выделите её и нажмите Ctrl + Enter. Мы все исправим!
Как правильно завязывать шнурки — Я Покупаю
Лично я узнал об этом лишь на своем четвертом десятке полгода назад, случайно наткнувшись на самый первый TED Talks. Это трехминутное видео о шнурках изменило мою жизнь. Я избавился от лишнего веса, стал выше ростом и выучил в совершенстве английский. Теперь ваша очередь.
Правильно или неправильно — терминология, конечно, смелая. Но, если вы из тех перфекционистов, для кого в аду нет ни серы, ни огня, а лишь слегка несимметрично стоят щербатые котлы, то эта заметка для вас. Неправильно завязанные шнурки выглядят, как на картинке ниже (это, кстати, Louis Vuitton, Ann Demeulemeester и Lanvin). Видите неровные петли: они пытаются выстроиться вдоль ботинка, одна чуть выше, другая чуть ниже. Кроме этого, такой узел легко развязывается без нашего на то желания.
Правильно завязанные шнурки, во-первых, держат узел лучше. Во-вторых, эстетически приятнее выглядят, так как петли идут паралельно шнуровке и остаются в таком положении.
Если на вас это произвело такое же впечатление, как на меня, то секрет всего в одном движении.
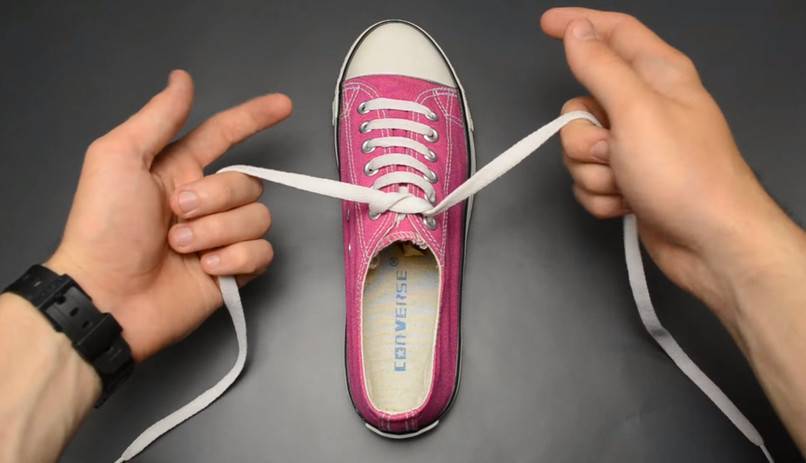
Первый этап одинаков в обоих случаях: кладем шнурки крест-на-крест и получаем те самые «кроличьи уши», в честь которых этот узел и назван (уверен, у него морская, как и большинства узлов, родословная, но сейчас это не имеет большого значения). Так вот, ошибка возникает на втором этапе (вид сверху от первого лица, как если бы вы смотрели вниз на свои руки, завязывающие ботинки). По какой-то причине, наши пальцы, во главе с не всегда правым мозгом, хотят левую петлю положить сверху на правую. Может быть это связано с праворукостью или леворукостью, и у левшей сразу все в порядке? Тем не менее. Мы, превозмогая инстинкты и привычки, кладем правую петлю сверху. Магия! Дальше завязываем, как обычно, и на выходе получаем ровный, красивый и надежный узел.
В самом первом абзаце я сказал, что узнал об этом лишь полгода назад. Первое время ощущение было, как если бы меня заставляли писать левой рукой. Зато уже спустя неделю, каждое утро завязывая ботинки, я радуюсь как ребенок и удивляюсь, почему этому не учат в школе, и по городам и весям не летают дирижабли, разбрасывая соответствующие листовки. Чего и вам желаю, друзья!
90000 Ian’s Shoelace Site — Questions & Answers 90001 90002 You’ll find the answers to various questions here, mainly for the benefit of people typing those questions into search engines. It’s also worth looking here before you send me a question for which I’ve already posted an answer. 90003 90004 Q: When were shoelaces invented? 90005 90002 Q: When were shoelaces invented? 90003 90002 Q: When were shoe laces invented? 90009 Q: When was the shoelace invented? 90009 Q: When was the shoe lace invented? 90009 Q: Who invented shoelaces? 90009 Q: Who invented shoe laces? 90009 Q: Who invented the shoelace? 90009 Q: Who invented the shoe lace? 90009 Q: Who was the shoelace inventor? 90009 Q: Who was the shoe lace inventor? 90009 Q: Who was the inventor of shoelaces? 90009 Q: Who was the inventor of shoe laces? 90009 Q: Who was the inventor of the shoelace? 90009 Q: Who was the inventor of the shoe lace? 90003 90002 90023 A: 90024 No-one knows exactly! Like shoes, shoelaces have been around for thousands of years, long before names of inventors were ever recorded.Having started as basic string or leather thongs with which primitive humans bound their foot coverings, they would have gradually evolved into the shoelaces that we know today, with no individual ever credited with their «Invention». 90003 90002 URBAN MYTH WARNING! 90009 It is widely mis-reported that shoelaces were invented by Harvey Kennedy on 27th March 1790. This date is 90023 centuries 90024 after shoelaces were in common use and is clearly incorrect. Perhaps Harvey invented a particular type of shoelace, but he did not «invent shoelaces».90003 90004 Q: How do you tie your shoelaces? 90005 90002 Q: How do you tie your shoelaces? 90003 90002 Q: How do you tie your shoe laces? 90009 Q: How do you tie your shoes? 90009 Q: How do you tie your shoelace knot? 90009 Q: How do you tie your shoe lace knot? 90009 Q: How do you tie shoelaces? 90009 Q: How do you tie shoe laces? 90009 Q: How do you tie shoes? 90009 Q: How do you tie a shoelace knot? 90009 Q: How do you tie a shoe lace knot? 90009 Q: Tutorial: How to tie your shoelaces.90009 Q: Tutorial: How to tie your shoe laces. 90009 Q: Tutorial: How to tie your shoes. 90009 Q: Tutorial: How to tie shoelaces. 90009 Q: Tutorial: How to tie shoe laces. 90009 Q: Tutorial: How to tie shoes. 90009 Q: Tutorial: Tying your shoelaces. 90009 Q: Tutorial: Tying your shoe laces. 90009 Q: Tutorial: Tying your shoes. 90009 Q: Tutorial: Tying shoelaces. 90009 Q: Tutorial: Tying shoe laces. 90009 Q: Tutorial: Tying shoes. 90009 Q: Tutorial: Shoelace tying. 90003 90002 90023 A: 90024 The best general purpose shoelace knot — and the original reason for this website — is my own Ian Knot.Not only is it the world’s fastest shoelace knot, it also happens to looks neat and symmetrical, causes less wear and tear on the laces, stays securely tied yet unties easily when required. 90003 90062 90002 If, on the other hand, you meant this question generally, my Tying Shoelaces page contains everything you need to know, including a number of different Shoelace Knots. 90003 90004 Q: Are there other ways to tie your shoelaces? 90005 90002 Q: Are there other ways to tie your shoelaces? 90003 90002 Q: Are there other ways to tie your shoe laces? 90009 Q: Are there other ways to tie your shoes? 90009 Q: Are there other ways to tie shoelaces? 90009 Q: Are there other ways to tie shoe laces? 90009 Q: Are there other ways to tie shoes? 90009 Q: Are there other ways of tying shoelaces? 90009 Q: Are there other ways of tying shoe laces? 90009 Q: Are there other ways of tying shoes? 90009 Q: Are there other shoelace knots? 90009 Q: Are there other shoe lace knots? 90009 Q: Are there different ways to tie your shoelaces? 90009 Q: Are there different ways to tie your shoe laces? 90009 Q: Are there different ways to tie your shoes? 90009 Q: Are there different ways to tie shoelaces? 90009 Q: Are there different ways to tie shoe laces? 90009 Q: Are there different ways to tie shoes? 90009 Q: Are there different shoelace knots? 90009 Q: Are there better shoelace knots? 90009 Q: Are there faster shoelace knots? 90009 Q: Are there quicker shoelace knots? 90009 Q: Are there easier shoelace knots? 90009 Q: Are there stronger shoelace knots? 90003 90002 90023 A: 90024 Head for my Shoelace Knots page, where you’ll find a number of different knots for tying shoes.90003 90002 The two knots that I reckon everyone should know are my own Ian Knot, which is both better, faster and easier, plus my Ian’s Secure Shoelace Knot, which will hold even the most slippery shoelace securely tied. Besides these, there are several other common shoelace knots plus some lesser known methods. 90003 90004 Q: How do you tie shoelaces with one hand? 90005 90002 Q: How do you tie shoelaces with one hand? 90003 90002 Q: How do you tie shoe laces with one hand? 90009 Q: How do you tie shoes with one hand? 90009 Q: Is there a one handed shoelace knot? 90009 Q: Is there a one handed shoe lace knot? 90009 Q: Is there a handicapped shoelace knot? 90009 Q: Is there a handicapped shoe lace knot? 90009 Q: Is there a disabled shoelace knot? 90009 Q: Is there a disabled shoe lace knot? 90009 Q: Is there a shoelace knot for one hand? 90009 Q: Is there a shoe lace knot for one hand? 90009 Q: Tutorial: One handed shoelace knot.90009 Q: Tutorial: One handed shoe lace knot. 90009 Q: Tutorial: One handed shoelace tying. 90009 Q: Tutorial: One handed shoe lace tying. 90009 Q: Tutorial: Tying shoelaces one handed. 90009 Q: Tutorial: Tying shoe laces one handed. 90009 Q: Tutorial: Tying shoes one handed. 90009 Q: Tutorial: Handicapped shoelace knot. 90009 Q: Tutorial: Handicapped shoe lace knot. 90009 Q: Tutorial: Disabled shoelace knot. 90009 Q: Tutorial: Disabled shoe lace knot. 90003 90002 90023 A: 90024 Almost all shoelace knots are designed to be tied with two hands.Most are quite difficult — if not impossible — to tie using only one hand. 90003 90002 Many people nonetheless need to tie their shoelaces one-handed. Besides those who are physically missing one or more arms, hands or fingers, there are those who have suffered strokes or have been crippled by arthritis, as well as those who are temporarily disabled through injury or other restrictions. 90003 90002 A few solutions exist on this site, including the One Handed Shoelace Knot and the One Handed Lacing.I’ve even created a video of how to tie my Ian Knot with one hand. 90003 90002 Alternatives include elastic shoelaces, magnetic clasps, spring catches or toggles, lace-in zippers or Velcro. 90003 90004 Q: Is there a shoelace knot that will not come undone? 90005 90002 Q: Is there a shoelace knot that will not come undone? 90003 90002 Q: Is there a shoelace knot that will not come untied? 90009 Q: Is there a shoelace knot that will not come loose? 90009 Q: Is there a shoelace knot that will not loosen? 90009 Q: Is there a shoelace knot that does not come undone? 90009 Q: Is there a shoelace knot that does not come untied? 90009 Q: Is there a shoelace knot that does not come loose? 90009 Q: Is there a shoelace knot that does not loosen? 90009 Q: Is there a more secure shoelace knot? 90003 90002 90023 A: 90024 I’ve studied a number of more secure shoelace knots, most of which are based on wrapping around a second time in some manner.90003 90002 I’ve combined the best features of several such knots to produce my Ian’s Secure Shoelace Knot, with the emphasis on symmetry. 90003 90002 Note that my Ian Knot, the World’s Fastest Shoelace Knot, is quite secure for all normal activities. 90003 90004 Q: Why do my shoelaces come undone? 90005 90002 Q: Why do my shoelaces come undone? 90003 90002 Q: Why do my shoelaces come untied? 90009 Q: Why do my shoelaces come loose? 90009 Q: Why do my shoelaces slip? 90009 Q: Why will not my shoelaces stay tied? 90009 Q: Why do my shoe laces come undone? 90009 Q: Why do my shoe laces come untied? 90009 Q: Why do my shoe laces come loose? 90009 Q: Why do my shoe laces slip? 90009 Q: Why will not my shoe laces stay tied? 90003 90002 90023 A: 90024 If tied correctly, 90023 ALL 90024 the normal shoelace knots, including my Ian Knot, should stay securely tied.90003 90002 Most people discover that their shoelaces slip because they are, without realising it, tying an un-balanced «Granny Knot». 90003 90002 My extensive Granny Knot section shows how to find out whether you are tying a balanced knot, and if not, how to fix it. 90003 90004 Q: How do you stop your shoelaces coming undone? 90005 90002 Q: How do you stop your shoelaces coming undone? 90003 90002 Q: How do you stop your shoelaces coming untied? 90009 Q: How do you stop your shoelaces coming loose? 90009 Q: How do you stop your shoelaces slipping? 90009 Q: How do you stop your shoe laces coming undone? 90009 Q: How do you stop your shoe laces coming untied? 90009 Q: How do you stop your shoe laces coming loose? 90009 Q: How do you stop your shoe laces slipping? 90003 90002 90023 A: 90024 If you find your shoelaces are always coming undone, no matter how tightly you tie them, chances are that you are tying an un-balanced «Granny Knot».90003 90002 My extensive Granny Knot section shows how to reverse your Starting Knot in order to change an un-balanced «Granny» knot into a balanced «Reef» or «Square» knot that should stay securely tied. 90003 90004 Q: Why are my shoelace bows crooked? 90005 90002 Q: Why are my shoelace bows crooked? 90003 90002 Q: Why do my shoelaces have crooked bows? 90009 Q: Why do my shoelace bows sit crooked? 90009 Q: Why do my shoelaces sit crooked? 90009 Q: Why do not my shoelaces have straight bows? 90009 Q: Why do not my shoelace bows sit straight? 90009 Q: Why do not my shoelaces sit straight? 90009 Q: How do I fix crooked shoelace bows? 90009 Q: How do I fix crooked shoelaces? 90009 Q: How do I make my shoelace bows sit straight? 90009 Q: How do I make my shoelaces sit straight? 90009 Q: Tutorial: Fixing crooked shoelaces.90009 Q: Tutorial: Fixing crooked bows. 90009 Q: Tutorial: Tying straight bows. 90003 90002 90023 A: 90024 Crooked shoelace bows are usually a sign that the knot has been tied with an un-balanced «Granny Knot». This does not just apply to crooked shoelaces; it’s also true for crooked bows on dresses, crooked hair ribbon bows, even crooked wedding invitation bows. 90003 90002 My extensive Granny Knot section shows how to reverse your Starting Knot in order to change an un-balanced «Granny» knot into a balanced «Reef» or «Square» knot with a perfectly straight bow.90003 90004 Q: How do you lace your shoes? 90005 90002 Q: How do you lace your shoes? 90003 90002 Q: Are there other ways to lace your shoes? 90009 Q: Are there different ways to lace your shoes? 90009 Q: Are there better ways to lace your shoes? 90009 Q: Are there cool ways to lace your shoes? 90009 Q: Are there faster ways to lace your shoes? 90009 Q: Are there quicker ways to lace your shoes? 90009 Q: Are there easier ways to lace your shoes? 90009 Q: Are there stronger ways to lace your shoes? 90009 Q: How do you lace shoes? 90009 Q: Are there other ways to lace shoes? 90009 Q: Are there different ways to lace shoes? 90009 Q: Are there better ways to lace shoes? 90009 Q: Are there cool ways to lace shoes? 90009 Q: Are there faster ways to lace shoes? 90009 Q: Are there quicker ways to lace shoes? 90009 Q: Are there easier ways to lace shoes? 90009 Q: Are there stronger ways to lace shoes? 90009 Q: How can you make your shoelaces shorter? 90009 Q: How can you make your shoelaces longer? 90009 Q: Tutorial: How to lace your shoes.90009 Q: Tutorial: How to lace shoes. 90009 Q: Tutorial: Ways to lace your shoes. 90009 Q: Tutorial: Ways to lace shoes. 90009 Q: Tutorial: Lacing shoes. 90009 Q: Tutorial: Shoe lacing. 90003 90002 90023 A: 90024 There are literally trillions of possible ways of lacing an average shoe, although many of these are hopelessly tangled messes. 90003 90002 Realistically, there’s still a multitude of practical combinations, of which you’ll find a number of the more useful examples in my Shoe Lacing Methods section, each with their own benefits such as ease of use, speed, appearance, comfort, security, strength, wear and tear, length of lace used, etc.90003 90002 Of these, my own personal favourite is the simple and efficient Over Under Lacing method. 90003 90004 Q: How do you straight lace shoes? 90005 90002 Q: How do you straight lace shoes? 90003 90002 Q: How do you do straight lacing? 90009 Q: How do you lace shoes straight across? 90009 Q: How do you do bar lacing? 90009 Q: How do you do Lydiard lacing? 90009 Q: How do you checkerboard lace shoes? 90009 Q: How do you do checkerboard lacing? 90009 Q: How do you lace shoes like a checkerboard? 90009 Q: How do you two color lace shoes? 90009 Q: How do you two colour lace shoes? 90009 Q: How do you lace shoes with two colors? 90009 Q: How do you lace shoes with two colours? 90009 Q: How do you do two color lacing? 90009 Q: How do you do two colour lacing? 90009 Q: How do you lace shoes for footbag? 90009 Q: How do you lace shoes for hackey sack? 90009 Q: How do you lace shoes for hacky sack? 90009 Q: How do you do footbag lacing? 90009 Q: How do you do hackey sack lacing? 90009 Q: How do you do hacky sack lacing? 90009 Q: Tutorial: How to straight lace shoes.90009 Q: Tutorial: How to bar lace shoes. 90009 Q: Tutorial: How to do Lydiard lacing. 90009 Q: Tutorial: How to checkerboard lace shoes. 90009 Q: Tutorial: How to two color lace shoes. 90009 Q: Tutorial: How to two colour lace shoes. 90009 Q: Tutorial: How to lace shoes for footbag. 90009 Q: Tutorial: How to lace shoes for hackey sack. 90009 Q: Tutorial: How to lace shoes for hacky sack. 90009 Q: Tutorial: Straight lacing shoes. 90009 Q: Tutorial: Bar lacing shoes. 90009 Q: Tutorial: Lydiard lacing shoes.90009 Q: Tutorial: Checkerboard lacing shoes. 90009 Q: Tutorial: Two color lacing shoes. 90009 Q: Tutorial: Two colour lacing shoes. 90009 Q: Tutorial: Footbag lacing shoes. 90009 Q: Tutorial: Hackey sack lacing shoes. 90009 Q: Tutorial: Hacky sack lacing shoes. 90003 90002 90023 A: 90024 These are some of the most often requested lacing variations. Straight Lacing has been around for hundreds of years, whereas patterns using two or more colors of lace come and go with fashion trends.Many sneakers nowadays are supplied with spare laces in complementary colors, prompting many people to want to lace those sneakers using two or more colors. 90003 90002 My extensive Shoe Lacing Methods and Bi-color Lacing Methods sections contain a number of the more popular examples, including Straight Bar Lacing (= Lydiard Lacing), Checkerboard Lacing and Double Lacing. 90003 90004 Q: How do you shorten shoelaces? 90005 90002 Q: How do you shorten shoelaces? 90003 90002 Q: How do you cut down shoelaces? 90009 Q: How do you make shoelaces shorter? 90009 Q: How do you fix excessively long shoelaces? 90009 Q: How do you stop shoelace ends from dragging? 90009 Q: How do you keep shoelace ends off the ground? 90009 Q: How do you lengthen shoelaces? 90009 Q: How do you make shoelaces longer? 90009 Q: How do you fix excessively short shoelaces? 90009 Q: How do you make shoelaces the correct length? 90003 90002 90023 A: 90024 It’s rare for shoelaces to be the exact length; most seem to be excessively long nowadays.The best solution is to figure out the correct length, then either replace the shoelaces or shorten them yourself and replace the aglets. 90003 90002 You may instead choose a different Lacing Method that matches the length of your existing shoelaces. There are methods suited to either longer or shorter laces. 90003 90002 For long shoelaces, use a bulkier Shoelace Knot that consumes more lace, such as many people do with the Double Shoelace Knot.Any amount of excess lace can be used up with the Double Ian Knot, albeit with a ridiculous looking result! 90003 90004 Q: What is a shoelace tip called? 90005 90002 Q: What is a shoelace tip called? 90003 90002 Q: What are shoelace tips called? 90009 Q: What is the name for a shoelace tip? 90009 Q: What is the tip of a shoelace called? 90009 Q: What is the end of a shoelace called? 90009 Q: What do you call the tip of a shoelace? 90009 Q: What do you call the end of a shoelace? 90009 Q: What do you call the sleeve on the end of a shoelace? 90009 Q: What is the sleeve on the end of a shoelace called? 90009 Q: What is the name for the sleeve on the end of a shoelace? 90009 Q: What do you call the sleeves at the ends of shoelaces? 90009 Q: What are the sleeves on the ends of shoelaces called? 90009 Q: What is the name for the sleeves on the ends of shoelaces? 90003 90002 90023 A: 90024 The plastic or metal sleeves at the ends of shoelaces are called aglets (or «aiglets»).Besides making an interesting trivia or crossword puzzle question, aglets have several functions: They prevent the lace ends from fraying, they make the laces easier to hold, and they make them easier to pass through the eyelets. 90003 90002 The word «aglet» (or «aiglet») comes from Old French «aguillette» (or «aiguillette»), which is the diminutive of «aguille» (Or «aiguilee»), meaning «needle». This in turn comes from the original Latin word for needle: «acus». An «aglet» is thus like a small «needle» at the end of a shoelace.90003 90004 Q: How do you fix aglets? 90005 90002 Q: How do you fix aglets? 90003 90002 Q: How do you repair aglets? 90009 Q: How do you replace aglets? 90009 Q: How do you strengthen aglets? 90009 Q: How do you make new aglets? 90009 Q: How do you decorate aglets? 90003 90002 90023 A: 90024 Aglets, the little plastic or metal sleeves at the end of shoelaces, are generally plastic nowadays, and are prone to damage, breakage, even loss. See my Aglet Repair page for some ways to fix them.90003 90004 Q: Where can I buy aglets? 90005 90002 Q: Where can I buy aglets? 90003 90002 Q: Where can I get aglets? 90009 Q: Where do I buy aglets? 90009 Q: Where do I get aglets? 90009 Q: Who sells aglets? 90003 90002 90023 A: 90024 Aglets, the little plastic or metal sleeves at the end of shoelaces, are tricky to buy. Plastic aglets are generally molded directly onto the shoelace, while metal aglets need to be crimped onto the shoelace with a press that’s carefully matched to both the aglet and the shoelace thickness.Both require expensive machinery. 90003 90002 Some merchants on Amazon.com are offering metal aglets. Note that many of these are quite large, more suited to thick drawstrings than to thin shoelaces. 90003 90002 Buy aglets from Amazon.com (paid link) 90003 90002 NOTE: As an Amazon Associate I earn from qualifying purchases. 90003 90002 For various home-made alternatives, see my Aglet Repair section. 90003 90004 Q: Is not a shoelace tip called a «flugelbinder»? 90005 90002 Q: Is not a shoelace tip called a «flugelbinder»? 90003 90002 Q: Is not a shoelace tip called a «fluglebinder»? 90009 Q: Is not a shoelace tip called a «floogelbinder»? 90009 Q: Is not a shoelace tip called a «flooglebinder»? 90009 Q: Is not a shoelace tip called a «flugel binder»? 90009 Q: Is not a shoelace tip called a «flugle binder»? 90009 Q: Is not a shoelace tip called a «floogel binder»? 90009 Q: Is not a shoelace tip called a «floogle binder»? 90009 Q: What is a «flugelbinder»? 90009 Q: What is a «fluglebinder»? 90009 Q: What is a «floogelbinder»? 90009 Q: What is a «flooglebinder»? 90009 Q: What is a «flugel binder»? 90009 Q: What is a «flugle binder»? 90009 Q: What is a «floogel binder»? 90009 Q: What is a «floogle binder»? 90003 90002 90023 A: 90024 «Flugelbinder» — however you choose to spell it — is 90023 NOT 90024 the correct name for a shoelace tip (which is actually called an aglet).90003 90002 This fictitious addition to the English language seems to have originated in the 1988 movie «Cocktail» (see excerpt) during a discussion about the ordinary objects that can turn their inventors into millionaires. 90003 90002 NOTE: This page is mainly for the benefit of people who are searching the Internet. Should they type phrases such as these into a search engine and be directed here, this page will redirect them to the answers within my site. If you have not found the answer to your question here, please Contact Ian.90003 .90000 Ian’s Shoelace Site — Shoelace Tips for Everyone 90001 90002 There’s some shoelace tips that apply to everyone, young and old alike. This section contains general tips about shoelace comfort, security, appearance and length adjustment. 90003 90004 Lacing for Comfort 90005 90006 90007 Minimize the pressure points caused by hard, round shoelaces by replacing them with soft, flat shoelaces. 90008 90007 Also for comfort, Criss Cross Lacing minimizes pressure points.90008 90007 To reduce the pressure of shoelaces on the upper ridge of the foot, use Straight Bar Lacing. 90008 90007 To allow the sides of boots to flex more easily, use Army Lacing. 90008 90015 90004 Preventing Shoelaces Coming Undone 90005 90006 90007 Check that you’re not inadvertently tying an un-balanced Granny Knot (which comes undone much more easily). 90008 90007 Learn a more secure knot, such as Ian’s Secure Shoelace Knot.90008 90007 Regardless of the knot used, finish it off by pulling the knot nice and tight. Follow-up by pushing the bits in the centre of the knot snugly together to make the knot compact and secure. 90008 90007 Replace shoelaces made of slippery synthetic materials (such as nylon) with ones made of less slippery materials (such as polyester) or, better still, ones made of cotton, hemp or other natural fibers. 90008 90007 To make shiny shoelaces less slippery, roughen them up with some coarse sandpaper.90008 90007 Shoelaces can be made less slippery by applying a grippy product to the surface, such as beeswax, rubber cement or a specialist product like Lace-Stick®. 90008 90007 Ensure that the shoelaces are not too long, either by replacing them or by shortening them to the correct length. Besides the obvious fact that long loops or ends are more likely to be either snagged or stepped on, the fact that long laces flop around more also tends to work the knots loose. 90008 90015 90004 Excessively Long Shoelaces 90005 90006 90007 To avoid stepping on excessively long loops, tuck them under the crossovers of lacing down the middle of the shoe.90008 90007 Use two or more successive Ian Knots, as shown on my Double Ian Knot page. This works well, though it looks a bit ridiculous and can be fickle to un-tie. 90008 90007 Adopt a different lacing pattern, such as Ladder Lacing or Spider Web Lacing, which use up more shoelace and effectively «shorten» the ends. For maximum shortening, use Supernova Lacing. 90008 90007 Replace straight lacing methods like Straight Bar Lacing with the identical looking End Shortening Lacing, which invisibly consumes more shoelace.90008 90007 Artificially shorten the shoelaces as follows: Lace the shoes on your feet, then adjust the end lengths to a reasonable length (about 250 mm) by pulling the excess lace back through the eyelets until all the excess is sitting at the bottom of the shoe (ie. near the toes). Tie a knot at that point to keep the excess down there. 90008 90007 An alternative to tying a knot at the bottom is to create a triple-pass. Start lacing the shoe with a straight section across the bottom eyelets, then run both ends back across the bottom and feed a second time through the opposite bottom eyelets.Finish by lacing the remainder of the shoe normally. 90008 90007 If the laces are way too long, cut out a section and re-join the two cut ends. This can be done with a simple Reef Knot, or flat laces can be either sewn or glued together, while synthetic laces can even be melted together. 90008 90007 The ultimate solution is to shorten the shoelaces to the correct length by cutting off the ends, then replacing the aglets (the plastic tips) as per my Aglet Repair section.90008 90007 When shortening a shoelace to length, save time by only shortening one end. Many people find that a clear heat shrink tubing aglet is a close enough match to the original aglet. In this case, shift the lacing along so that one end is the desired length and all the excess is at the other end, then shorten just that end to the same length. 90008 90015 90004 Excessively Short Shoelaces 90005 90002 While the obvious solution for excessively short shoelaces is to replace them with ones of the correct length, here’s some great emergency measures, especially if one lace end has broken at short notice and there’s no ready replacement.90003 90006 90007 Adopt a different lacing pattern such as Army Lacing or Bow Tie Lacing, which uses less shoelace. 90008 90007 Re-lace the shoes, skipping the bottom pair of eyelets, or more if the lace ends are really short. 90008 90007 Tie a Reef Knot, which is basically a Standard Shoelace Knot minus the loops and drawstrings. This means that it looks different to a regular «bow», and it also uses a slightly different method of untying. 90008 90015 90004 End Lengths Shifting 90005 90002 Some shoes suffer from laces that perpetually shift, such that one end gradually gets longer than the other.There are various possible reasons and therefore various possible solutions. 90003 90006 90007 If using a non-symmetrical lacing method, particularly Shoe Shop Lacing, re-lace the shoes with a symmetrical lacing method, such as Criss Cross Lacing. 90008 90007 If using a non-symmetrical shoelace knot, particularly the Standard Shoelace Knot, try learning a symmetrical method, such as my own Ian Knot. 90008 90007 Ensure that all eyelets are a similar diameter.Those that are simply holes punched in the leather can be easily enlarged with a leather punch, reamer or even a sharp drill bit. 90008 90007 Before lacing the shoe, tie a permanent knot in the middle of the section that will run across the bottom eyelets (the grey section in most of my diagrams). Any shift will be halted when the knot reaches the eyelet on either side. 90008 90007 An alternative to tying a knot at the bottom is as follows. Start lacing the shoe with a straight section across the bottom eyelets, then run both ends back across the bottom and feed a second time through the opposite bottom eyelets.The extra friction of the double-passes of shoelace through those eyelets will reduce any shift. 90008 90015 90004 Shoelaces Worn In Icy Conditions 90005 90006 90007 To prevent shoelaces icing up and becoming stiff as wire, take them off and soak them in a waterproofing solution (such as «Nixwax») and wipe off the excess. Once dry they will have a slightly waxy feel but will still hold a knot properly, especially if you also adopt the Ian’s Secure Shoelace Knot.90008 90007 For those who wear crampons (spiked fittings for walking on snow or ice), Hiking / Biking Lacing can be worn with the loops to the outside, further away from snagging in the spikes of the adjacent foot. 90008 90015 90004 Preventing Shoe Tongues Slipping Sideways 90005 90002 Many shoes have tongues that tend to slip towards the outside of the foot. This is particularly common on shoes with flatter tongues that do not fit the curvatures of the top part of the foot.90003 90002 To minimize this slippage, the top of most shoe tongues includes some form of «centering loop»: 90003 90006 90007 A separate loop of leather or material; 90008 90007 A label that’s stitched at the top and bottom and open at both sides; 90008 90007 A pair of vertical grooves cut through the upper layer of material or right through the tongue. 90008 90015 90002 There are several ways of lacing through such tongue centering loops to minimize sideways movement: 90003 90006 90007 Avoid straight lacing methods like Straight Bar Lacing because they do not hold horizontally.90008 90007 If using Over Under Lacing, note that the «Over» sections are more effective than the «Under» sections because the loop will end up between the sides of the shoe, limiting the sideways movement. 90008 90007 Use a lacing method that runs the laces through the loop at a steeper angle, such as Lattice Lacing or Zipper Lacing. 90008 90007 Rather than lacing the whole shoe differently, use Zipper Lacing only on those eyelets immediately above and below the tongue loop.90008 90007 If you 90118 really 90119 want control via a lacing method, try using Loop Back Lacing just at the tongue centering loop. The tongue generally slips outwards (towards the «little toe» side) so run the lace end that is on the «big toe» side of the shoe through the tongue centering loop and back again while the other side only loops through the shoelace and back again. Do not run both ends through the tongue centering loop, otherwise the loop would be scrunched up.90008 90007 Finally, another possibility is to forget the lacing and to physically restrict how easily the shoelaces slide through the tongue centering loop. For example, stitch it closed into a tighter loop. Or swap the sports laces for fat laces (which has the added advantage of looking cool!) 90008 90015 90002 In addition, tongue centering loops destroy the aesthetics of most lacing methods. It’s inevitable that part of the lacing will end up hidden as it passes through the centering loop.There are a couple of measures to minimize the effects: 90003 90006 90007 Run just 90118 one 90119 of the segments through the loop, then run the other segment across the top. That way only 90118 one 90119 diagonal of the «X» would be hidden by the loop — and even then, only that part that was not already hidden by the outer segment. 90008 90007 This can be taken one step further by initially running the first segment across the 90118 top 90119 of the centering loop, then back through the loop, then back across the top again — effectively forming a complete loop through the centering loop.However, this would scrunch the loop somewhat. 90008 90015 90004 Helping Shoelaces Last Longer 90005 90006 90007 Try my Ian Knot, which uses fewer steps and thus reduces wear and tear from handling. 90008 90007 Check that you’re not inadvertently tying an un-balanced Granny Knot, which comes undone more easily and thus increases wear and tear due to more frequent re-tying. 90008 90007 When pulling shoelaces tight, pull outwards rather than upwards, thus reducing friction against the top eyelets.90008 90007 Pull firmly and evenly and do not tug quickly on the lace ends. 90008 90007 Metal eyelets often wear through shoelaces if they are rough or sharp on the inside. Such edges can be smoothed with either sandpaper or a Dremel or by painting over them with either clear nail polish or two-part epoxy glue. 90008 90007 Sometimes the friction of a shoelace will actually cause a metal eyelet to develop a sharp edge. In this case, try twisting the eyelet 90 ° with a pair of pliers so that a fresh, smooth surface of the eyelet contacts the shoelace.90008 90007 Cheap, one-piece metal eyelets are notorious for having very rough edges. These can be replaced with smoother, two-part metal eyelets, which can be purchased — complete with punches and dies — from craft or haberdashery stores. 90008 90007 If shoelaces do begin to fray at the eyelets, shift the laces along by an inch (ie. Make one end longer than the other). The eyelets will then contact fresh parts of the shoelaces, preventing the already-frayed sections from wearing through completely.90008 90015 90002 If you have any useful shoelace tips that everyone can benefit from, please Contact Ian so that they can be shared with others. 90003 .90000 Ian’s Shoelace Site — Shoelace Knots — How To Tie Your Shoes 90001 90002 Want to learn how to tie your shoes? Whether you’re after shoelace tying speed, simplicity, security or style, here’s twenty different shoelace knots to choose from — including several that I’ve created. 90003 90002 NOTE: Do not be put off by this daunting collection — most people only need to learn one «regular» knot and perhaps one «secure» knot. Other choices can also help when teaching children, particularly if the child is frustrated by the «regular» shoelace knot technique.90003 90002 90007 20 Different Ways To Tie Shoes 90008 90003 90002 90011 SECTION 1 — Regular Shoelace Knots 90012 90003 Standard Shoelace Knot 90002 Also known as the 90015 «Bunny Rabbit» 90016 or the 90015 «Loop, Swoop and Pull» 90016 knot, this is probably the most common method for tying shoes. Make a loop with one end, wrap the other end around and pull a loop through the «hole» in the middle. 90003 Two Loop Shoelace Knot 90002 Also known as the 90015 «Bunny Ears» 90016 shoelace knot (due to its two loops) or as the 90015 «Bowknot» 90016.Make a loop with both ends, then simply tie a knot with them. It’s often tied incorrectly, resulting in an un-balanced Granny Knot. 90003 90002 90011 SECTION 2 — Secure Shoelace Knots 90012 90003 Ian’s Secure Shoelace Knot 90002 Also known as the 90015 «Double Slip Knot» 90016, this is a secure shoelace knot with a simple, symmetrical method of tying. Cross two loops and pass them both through the «hole» in the middle. Recommended! 90003 Surgeon’s Shoelace Knot 90002 Also known as the 90015 «Tibetan Trekking Knot» 90016 or 90015 «Sherpa Knot» 90016, this is the most common secure shoelace knot.Make a Standard Shoelace Knot, but before pulling tight, run the loop around and through the middle for a second time. 90003 Berluti Shoelace Knot 90002 Also known as the 90015 «Double Shoestring Knot» 90016, this is a secure knot popularized by Olga Berluti. Begin as per the Standard Shoelace Knot and finish by feeding the opposite loop through the middle before tightening. 90003 Double Shoelace Knot 90002 Also known as the 90015 «Shoe Clerk’s Knot» 90016, this is a crude method of making a knot «permanent» or for consuming excess lace to keep the ends from dragging.Tie a Standard Shoelace Knot, then tie an overhand knot with the finished loops. 90003 Double Ian Shoelace Knot 90002 By hanging onto the loops and repeating the Ian Knot technique, the result is the more secure 90015 Double Ian Shoelace Knot 90016. This is also handy for consuming excess lace to keep the ends from dragging. 90003 Mega Ian Shoelace Knot 90002 This is a more secure variation of my Ian Knot. Make a 90053 double-loop 90054 with both ends and simultaneously pull them through each other.The result is super-secure, though nowhere near as fast as the regular 90015 Ian Knot 90016. 90003 Two Stage Shoelace Knot 90002 This knot is made in two distinct stages. Make and secure one loop, then make and secure the other loop. The result is slightly more secure because it’s less likely for 90053 both 90054 stages to come undone. 90003 90002 90011 SECTION 3 — Special Purpose Shoelace Knots 90012 90003 Halloween Shoelace Knot 90002 A decorative knot that makes the perfect finishing touch for a Halloween outfit or for other «creepy» occasions.Tie your shoelaces with these miniature «Hangman’s Nooses». 90003 Boat Shoe Knot 90002 Often used on boat shoes (deck shoes) or moccasins with leather laces, the 90015 «Heaving Line Knot» 90016 creates decorative coils instead of knots. Each end is simply coiled around itself until all remaining lace is consumed. 90003 One Handed Shoelace Knot 90002 Here’s a simple knot for tying shoes with one hand. Lace the shoe with the bottom end permanently tied off, then secure the top end with a simple loop knot.90003 Reef Knot 90002 The 90015 Reef Knot 90016 is basically a Standard Shoelace Knot minus the loops. This is useful when the ends are not long enough to tie a regular bow, such as when a shoelace has broken. Also known as a 90015 «Square Knot» 90016. 90003 Equality Knot 90002 Created in conjunction with PUMA in Sep-2017 in support of marriage equality in Australia. Consists of my Ian’s Secure Shoelace Knot (with its central «Equality» symbol 90053 «=» 90054) symbolically tied at the 90053 side 90054 of the shoe.90003 90002 90011 SECTION 4 — Other Knot (s) 90012 90003 Crossed Ian Shoelace Knot 90002 This knot is a curiosity that often results from tying the Ian Knot incorrectly. Twisting the loops in the wrong direction results in a knot with the ends crossed within the knot. It 90053 seems 90054 more secure — but can easily fall apart. 90003 90002 90011 SECTION 5 — Starting Knots 90012 90003 Starting Knot 90002 All of the shoelace knots shown on this website use the same «Left-over-Right Starting Knot».Here’s how to tie this basic knot, known as a 90015 «Half Knot» 90016 or 90015 «Overhand Knot» 90016. 90003 Double Starting Knot 90002 The 90015 Double Starting Knot 90016 holds tighter, which is great when tying slippery shoelaces or when learning new knots — especially for kids. Begin as for a regular Starting Knot, then wrap around for a second time. 90003 .90000 How To Teach Kids To Tie Shoe Laces? 90001 90002 90003 Five-year-old Fred spent some good 15 minutes trying to tie his shoe. He would fold the strings, cross them, and then not know what to do. After multiple attempts, he succeeded, and the feel of pleasure at his accomplishment was too visible to be missed. 90004 90005 90006 90002 Tying shoes is one of the achievements that kids cherish because it gives them a sense of independence. Tying shoes is not just about the child’s happiness, but their development too.90006 90002 MomJunction tells you how you can teach your child to tie shoes, and the various methods of shoe-tying (with video tutorials). 90004 90006 90012 Why Should Your Child Learn To Tie Shoes? 90013 90002 While learning to wear their shoes right, your kid is also learning how to follow directions, planning, sequencing, and sorting. Here is what they learn in the process: 90006 90016 90017 When you are teaching your child to wear their shoes correctly, they are learning how to listen and follow directions.90018 90019 90016 90017 They understand sequencing. For example, they learn that the sock goes first and then the shoes, after which the strings are tied. 90018 90019 90016 90017 As they listen to you talking, they also start to classify and sort objects, such as a summer shoe, a winter shoe, etc. 90018 90019 90016 90017 As your child uses their fingers to tie the lace, they are working on their dexterity, which would eventually help them in holding a pen and other things. 90018 90019 90002 Also, it is one job less for you when you are taking your child out.But you need to wait until they attain a certain age when they are able to accomplish the task independently. 90006 90002 Back to top 90006 90002 [Read: 90037 How To Improve Concentration In Kids 90038] 90006 90012 When Can Children Learn To Tie Their Shoes? 90013 90002 Most children are able to tie their shoes by the age of six. Here’s how they develop their shoe-wearing skills: 90006 90044 90045 90046 90047 90048 Age 90049 90050 90047 90048 Shoe-wearing skills 90049 90050 90055 90046 90057 12 months 90058 90057 Babies can stick out their legs to put a shoe on them 90058 90055 90046 90057 2 years 90058 90057 They can remove low-top shoes 90058 90055 90046 90057 2.5 years 90058 90057 Most toddlers put on shoes with some help 90058 90055 90046 90057 3.5 years 90058 90057 They can put on shoes on the right foot and take them off completely, including untying the laces 90058 90055 90046 90057 6 years 90058 90057 Children can tie shoes after seeing a demonstration 90058 90055 90086 90087 90002 Tying shoes is an activity of daily living, commonly known as ADL. Therefore, it is a good idea to practice some fine motor exercises to help your child get a little ahead in the game.90006 90002 Back to top 90006 90012 Activities That Strengthen Fine Motor Skills Required For Shoe-tying 90013 90002 Before your child starts to tie their shoelace, they may practice some activities to master bilateral coordination, hand dexterity and finger manipulation, visual motor skills, visual perception, hand strength, and the ability to think, plan and execute a new motor skill. 90006 90002 Here are a few fun exercises and activities for kids: 90006 90098 Pins and rings: 90099 90016 90017 Take a few cloth pins and colored rings.90018 90019 90016 90017 Alternatively, you may buy it online. 90018 90019 90016 90017 Attach or pinch the pins on the rings by matching the colors. 90018 90019 90016 90017 This hand strengthening activity also makes the finger muscles work. 90018 90019 90016 90017 Later, this aids a child in holding onto a shoelace longer than they could before. 90018 90019 90002 [Read: 90037 Tips To Make Kids Independent 90038] 90006 90098 Threading with beads: (Age 3 and older) 90099 90016 90017 Threading helps kids ace their fine motor skills as it requires concentration, thinking, and finger movement.90018 90019 90016 90017 Take some beads of different colors. 90018 90019 90016 90017 Place some colored pipe cleaners in shades similar to the beads. 90018 90019 90016 90017 Let your child choose beads of colors matching that of the pipe cleaner. 90018 90019 90016 90017 Let them now thread beads to make strings. 90018 90019 90098 Weaving the cardboard: 90099 90016 90017 A yarn wrap activity is useful in enhancing a child’s fine motor skills, concentration, and imagination. 90018 90019 90016 90017 Start with a piece of cardboard box.90018 90019 90016 90017 Cut heart-shaped pieces out of it. You may try any other shape of your choice. 90018 90019 90016 90017 Ask your child to paint the hearts in some color. 90018 90019 90016 90017 Once the paint is dry, give your child yarns to thread through the heart. 90018 90019 90016 90017 You may hang these hearts in their room. 90018 90019 90002 Once your child is ready to learn how to tie their shoelace, you may begin with some simple methods of shoe-tying. 90006 90002 Back to top 90006 90002 [Read: 90037 Ways To Teach KIds To Be Responsible 90038] 90006 90012 Easy Shoelace-tying Methods For Kids 90013 90002 Here are some methods you can help your child to practice.Remember, however easy the method may be, practicing is key to success. 90006 90098 1. Beginner’s knot 90099 90016 90017 Place the shoes on a flat surface and let the laces fall to the sides of the shoe. 90018 90019 90016 90017 Grab both the laces and cross them one over the other. Pull them tightly. They will form a usual knot in the center. 90018 90019 90016 90017 Hold both the sides of lace over your fingers. 90018 90019 90016 90017 Run your right thumb and index fingers under the lace on one side and left fingers over it on the other side.90018 90019 90016 90017 Grab the opposite sides and pull both sides. 90018 90019 90002 Learn how to tie a beginner’s knot from this tutorial: 90006 90002 90209 90210 90006 90098 2. The bunny ears knot 90099 90016 90017 Place the shoes on a flat surface and let the laces fall to the sides of the shoe. 90018 90019 90016 90017 Begin by tying a basic knot as described above. 90018 90019 90016 90017 Form a bunny ear loop with one of the strings by grabbing one shoelace between your thumb and first two fingers.The loop will be small and the tail or the rear end long. 90018 90019 90016 90017 Make another bunny ear loop with the other shoestring. 90018 90019 90016 90017 Now, cross the loops one over the other and bring one of it from below. 90018 90019 90016 90017 Pull the bunny ear loops tightly and you’re done. 90018 90019 90002 Watch this tutorial for a better understanding: 90006 90002 90241 90210 90006 90002 [Read: 90037 Physical Development In Children 90038] 90006 90098 3.Circle method for tying shoes 90099 90016 90017 Place the shoes on a flat surface and let the laces fall to the sides.90018 90019 90016 90017 Start by tying a basic knot. 90018 90019 90016 90017 Form one more knot, but keep it loose. Do not tighten this knot and you will see a circle formed by this knot. Hold the shape using your hands and let it lie flat. 90018 90019 90016 90017 Put one shoelace inside that circle from the front. Keep the shoe string loose, but it should not slide out of the circle. 90018 90019 90016 90017 Put the other shoelace inside the circle from the back. You will be having two loops on each side of the knot.90018 90019 90016 90017 Tightly pull the loops and you are done. 90018 90019 90002 Circle shoe tying method video tutorial: 90006 90002 90277 90210 90006 90098 4. Ian knot technique 90099 90016 90017 Place the shoes on a flat surface and let the laces fall to the sides. 90018 90019 90016 90017 Begin by tying a basic knot. 90018 90019 90016 90017 Grab one of the shoelaces using your right hand thumb and forefinger to form a loop with the loose end on the front. 90018 90019 90016 90017 Grab the other shoe string using the thumb and forefinger of your left hand with the loose end on the back.90018 90019 90016 90017 Pass the loose ends through each other’s loop. 90018 90019 90016 90017 Pull the strings and tighten them. 90018 90019 90002 Watch this tutorial here: 90006 90002 90309 90210 90006 90002 Tying a shoelace is not rocket science, but some tips will make the task even easier. 90006 90002 Back to top 90006 90002 [Read: 90037 How To Help Left-Handed Child To Write 90038] 90006 90012 Tips To Teach Kids To Tie Shoes 90013 90322 90017 Take an untied shoe and place it between your knees or thighs.This way, your child does not have to bend and check what you are doing. 90018 90325 90326 90017 Sit right beside your child so that both of you have the same perspective. This makes it easier for you to teach your child. 90018 90325 90330 90017 Teach your child how to tie their shoelaces by practicing on a shoe, which has soft laces. 90018 90325 90334 90017 Color one side of the lace using a marker. This will make it easier for your child to distinguish between the two sides of the lace.90018 90325 90338 90017 Ask your child to hold one end of the shoelace in each hand. 90018 90325 90342 90017 Whatever you ask your child to do, make sure you are doing the same so that they can see and follow you. 90018 90325 90002 Back to top 90006 90002 Be patient while teaching your child. Nothing is more tempting than going for Velcro straps and making life easier, but for your child, there is no bigger fun than mastering a major skill. 90006 90002 Does your child know how to tie shoelaces? Did you follow any new methods? Share your experience and tips with us, in the comment section below.90006 90002 90037 Recommended Articles: 90038 90006 Was this information helpful? .